 |
Sorry about the mess
This article/secion is a mess! Please clean up this article before removing this template. |

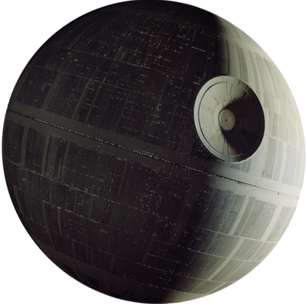
The DS-1 Death Star Mobile Battle Station, also designated as the DS-1 Orbital Battle Station and referred to as the Ultimate Weapon in early development stages and later as the Death Star I and the First Death Star, but typically referred to as the Death Star was a battle station the size of a moon. It was constructed by the Galactic Empire and designed by the Geonosians. It was destroyed by Luke Skywalker at the Battle of Yavin.
The first Death Star had 160 km in diameter.
History[]
The first plans of the Death Star were created by the Geonosians shortly before the Battle of Geonosis and Poggle the Lesser handed the plans to Count Dooku who gave them to his master Darth Sidious.
Clone Wars[]
Sidious began preparing the weapons construction as the Clone Wars raged on. Kyber crystals for the laser were taken, one such from Utapau around the middle of the war.
Fall of the Republic[]
Sidious, who had been orchestrating both sides of the Clone Wars, revealed himself as the Supreme Chancellor and destroyed almost all of the Jedi, forming the Galactic Empire with himself as the Emperor. Anakin Skywalker was tranformed into the feared Darth Vader and both Sidious and his master watched secretly over the battle station's construction in the years to come. Although many claimed to be responsible for the Death Star's construction, it was unkown who actually did. Some thought that it was the Geonosians working for the Separatist. It was more plausible that the station fell into Republic hands during it's early construction and then the Empire built it.
Across the Galaxy[]
The Death Star's construction started off at Geonosis but the station was moved elsewhere at some point. Grand Moff Wilhuff Tarkin and Director Orson Krennic were key individuals involved in this process. Eventually towards the end of it's completion, it went to the Scarif and Jedha systems. A squad of rebels led by Captain Cassian Andor and Jyn Erso managed to steal the plans for the battle station.
Capture of Princess Leia[]
Darth Vader captured princess Leia Organa and took her aboard the Death Star for interrogation. Tarkin, when she wouldn't give in, ordered the destruction of her homeplanet of Alderaan before her eyes. They fired the superlaser, destroying the planet completely and killing everyone on it including her father Bail Organa.
Destruction[]
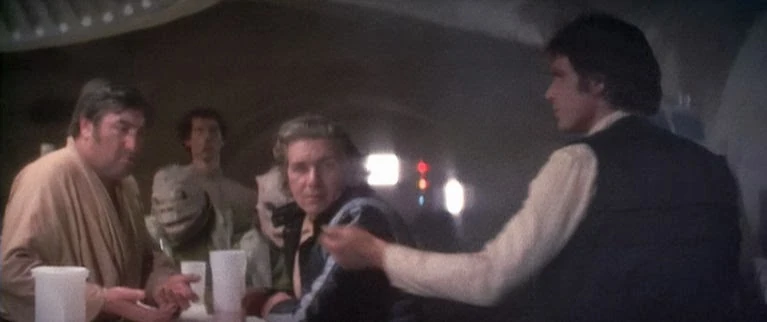
Obi-Wan Kenobi with Luke Skywalker, Han Solo and Chewbacca infiltrated the station and rescued Leia although the old Jedi Master was killed by Vader in a duel and they others were forced to leave without him. The Empire traced their ship the Millennium Falcon to the Rebel base on Yavin 4 where they prepared to fire. It took 24 hours for the laser to recharge on the first Death Star so the Rebels had time to gather their starfighter squadrons and send them in with an attack plan based on the plans that Jyn Erso had stolen not long ago. One by one the starfighters were picked off except for Luke Skywalker, Wedge Antilles and Biggs Darklighter who did the final run. Vader pursued them in his personal TIE Advanced x1 with two wingmen. Wedge was forced to pull out due to major damage to his fighter and Biggs was destroyed by Vader. Luke was saved by the arrival of Han Solo and Chewbacca in the Millennium Falcon who destroyed the two TIEs and crippled Vader. Luke took his shot which traveled down the shaft of the battle station to it's core and the station was destroyed just as the Death Star Gunners pulled the lever to send a superlaser to Yavin 4. Tarkin and all the Imperials aboard died although Vader's TIE Advanced was out of range of the explosion and he survived.
Legacy[]
Following the Death Star's destruction the Galactic Empire struggled slightly for control over the galaxy and the rebels were joined by more recruits. The Emperor was unimpressed with Vader's efforts and demoted him to a rank underneath Grand General Cassio Tagge until he could prove himself worthy. Eventually a second Death Star was built over Endor, larger than the first and the Emperor deliberately let the plans fall into rebel hands to draw them into a trap. The Rebels successfully destroyed the station resulting eventually a year afterwards with the fall of the Empire and the rise of the New Republic. The First Order built a much larger superweapon built into a planet and called it Starkiller Base. Starkiller Base was inspired by the Death Star but didn't share its main weaknesses. It was capable of destroying entire systems at once, a power which it demonstrates when destroying the Hosnian system. However, the Starkiller wasn't without weakness and Poe Dameron successfully destroyed it with the help of a ground assault team led by Han Solo.
Notable Locations[]
Note: Needs expanding
- Death Star Commissary
- Detention Level
- Garbage masher 3263827
- Hypermatter Reactors
- Overbridge
- Superlaser Control Station
- Docking Bay 327
Appearances[]
Note: This list is incomplete
- Star Wars: Galactic Defense (Mentioned only)
 Star Wars: Episode II Attack of the Clones (Appears in hologram)
- Ghosts of Mortis (Superlaser only) (Vision to Anakin Skywalker)
- Star Wars: Episode III Revenge of the Sith
- Tarkin
- Star Wars (LINE Webtoon)
- Lost Stars
- Catalyst
- Rogue One
- Star Wars: Episode IV A New Hope (First appearance)
- A New Hope: The Princess, the Scoundrel, and the Farm Boy
- A New Hope Read-Along Storybook and CD
- Escape from Darth Vader (Appears in final page illustration only)
- The Adventures of Luke Skywalker, Jedi Knight
- Star Wars: Battle Pod
- Star Wars: Princess Leia, Part I (Mentioned only)
- Star Wars: Princess Leia, Part II (Mentioned only)
- "Last Call at the Zero Angle"—Star Wars Insider 156 (Mentioned only; first identified as DS-1 platform)
- Heir to the Jedi (Mentioned only)
- The Weapon of a Jedi: A Luke Skywalker Adventure (Mentioned only)
- Star Wars 1: Skywalker Strikes (Mentioned only)
- Star Wars 2: Skywalker Strikes, Part II (Mentioned only)
- Star Wars 3: Skywalker Strikes, Part III (Mentioned only)
- Star Wars: Darth Vader 1: Vader (Appears in flashback(s))
- Star Wars 4: Skywalker Strikes, Part IV (Mentioned only)
- Star Wars: Darth Vader 2: Vader, Part II (Mentioned only)
- Star Wars: Darth Vader 3: Vader, Part III (Indirect mention only)
- Star Wars: Darth Vader 4: Vader, Part IV (Mentioned only in Opening Crawl)
- Star Wars: Darth Vader 5: Vader, Part V (Mentioned only in Opening Crawl)
- Star Wars 5: Skywalker Strikes, Part V (Mentioned only in Opening Crawl)
- Star Wars: Darth Vader 6: Vader, Part VI (Mentioned only in Opening Crawl)
- Star Wars 6: Skywalker Strikes, Part VI (Mentioned only in Opening Crawl)
- Star Wars: Darth Vader 7: Shadows and Secrets, Part I (Mentioned only)
- Star Wars 8: Showdown on the Smuggler's Moon, Part I (Mentioned only in Opening Crawl)
- Star Wars: Darth Vader 8: Shadows and Secrets, Part II (Appears in hologram)
- Star Wars 9: Showdown on the Smuggler's Moon, Part II (Mentioned only in Opening Crawl)
- Star Wars 11: Showdown on the Smuggler's Moon, Part IV (Mentioned only)
- Star Wars: Darth Vader 11: Shadows and Secrets, Part V (Mentioned only)
- Star Wars: Episode V The Empire Strikes Back (Mentioned only)
- The Empire Strikes Back: So You Want to Be a Jedi? (Mentioned only)
- Moving Target: A Princess Leia Adventure (Mentioned only)
- Star Wars: Episode VI Return of the Jedi (Mentioned only)
- "Blade Squadron"—Star Wars Insider 149–150 (Mentioned only)
- Star Wars: Uprising (Mentioned only)
- Aftermath (Mentioned only)
- Star Wars: Episode VII The Force Awakens (Pictured in Hologram only)